Posts

Showing posts with the label Distress Oxides ink

Colour it - Create it - Show it off! March Challenge Reminder

Image
Hey all! So here we are half way through March already and just wanted to remind you to enter into the challenge where as usual it is anything goes, to enter and for more information  click here . Absolutely loving the images I've been able to play with this month on the design team, so much I've made another 2 cards.   So starting with the card on the left the more complex of the two I would say. Firstly I downloaded the digi stamps and printed four images onto a sheet of A4  Color copy 160gsm pape r, which I then cut up to individual toppers.  Using Spectrum Noir Triblend brush pens I coloured in the one of the images, deciding to give the fairy a tanned colour to her skin along with a orange dress and accessories.  I used a spectrum noir clear sparkle pen to go over the fairies wings to give them a sparkle and coloured the bug's wings with a spectrum noir sandstone sparkle pen.   I cut down an A4 piece of super smooth card suitable for alcohol markers to...

Color It - Create It - Show It Off! March Challenge - My Besties

Image
 Hey all, Wow the start of another month already so that can only mean one thing the start of another challenge for Color it - Create it - Show it off! As always it is anything goes, for more information  click here.  So here is my inspiration for the start of this new challenge month, using Sherri Baldy's My Besties Forest Fairy Doll 2 , which can be purchased from  here. I have enjoyed colouring this image so much that I have been able to produce two cards. I would say the smaller card is the most simplistic with only involving matting and layering paper/ card along with stamping for the sentiment and colouring the image.  The other card the larger one involved colouring and stamping like the first but also involved using stencils and paste. So for this first card I downloaded my digi image and printed four of the same images on to a sheet of A4 paper, suitable for using alcohol markers on; once printed I then cut the paper up into four so had four individual ...

Time For Tea Designs - The Greater The Storm

Image
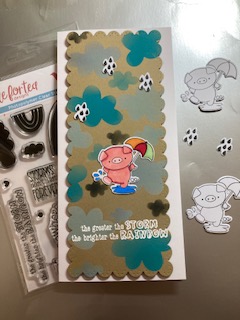
 Hey all! Just wanted to share with you a DL card I've made using Time for Tea Designs collections Hogs & Kisses and Storms Don't Last. Firstly I took a sheet of kraft card and cut out a panel using the scalloped slimline die.  Then using the over the rainbow stencil to ink blend clouds on to the kraft card panel using my time for tea designs beautiful blender brushes and distress oxides - tumbled glass, speckled egg, peacock feathers and black soot. Once I was happy with adequate number of clouds on the panel I then took from my pre-cut and stamped images a pig holding umbrella and splashing in a puddle.  To add colour to the image I used Spectrum Noir Triblend brush pens. Following colouring I decided I would heat emboss a sentiment in white along the bottom of the kraft card panel. To heat emboss I started by taking the sentiment stamp 'the greater the storm the brighter the rainbow' and sticking it to an acrylic block before adding Versamark ink to it and stampi...

Sherri Baldy's My Besties meets Pink Ink Designs and Time For Tea Designs

Image
Hi all! So today I thought I'd share with you another card I've made using Sherri Baldy's My Besties Gnome 3.  In this card I collaborated the digi image with a Pink Ink Designs stencil along with Time For Tea Designs sentiment stamps and a die.   I started off by reaching for a 7 by 7 white card blank, I then chose that I would use distress oxides inks in the following colours for the background: wilted violet, seedless preserve and abandoned coral.  In order to keep my stencil in place I used a small strip of masking tape to hold the stencil to my glass mat where the stencil over hanged the card blank.  Firstly using the abandoned coral before moving onto seedless preserve and finally wilted violet I blended the inks over the stencil using my Time for Tea Designs medium blender brushes - with these I have a separate brush for nearly each colour oxide however you can just have one brush per colour family: red, blue, green, purple, yellow, orange, pink and black alon...

Your body is a temple

Image
Hey all! So today I'm sharing this A6 card with you, which uses  Time for Tea Designs Workout Pigs collection  and an ink blended back using  Time for Tea Designs Sunny Side Up Again stencil . So firstly I die cut out the workout pigs, along with the heart thought bubble from smitten kittens, 2 clouds from the autumn scene cover plate set and a speech bubble from the speech bubble coordinating dies.  After that I stamped the detail onto the pigs and the outline of the heart thought bubble. Then onto colouring in the pigs with Spectrum Noir Triblend brush pens, for the pigs I used all three shades however for the shorts and head bands I only used the light and mid shades. Next I took an A6 white card blank landscaped and using the sunny side up again stencil grass edge, a blender brush and the distress oxide twisted citron I ink blended a grass area on the bottom area of the card mainly concentrating on the top of the grass area as will add another colour grass below....

My Besties Design Team - February Challenge

Image
 Hey there! So another month is here, which means a new challenge over on the Color it, Create it, Show it off blog; details of how to enter can be found  here .  As always the challenge is anything goes therefore any image, project, techniques are welcome. So this is my second design team entry and I have thoroughly enjoyed making this card. I started firstly by choosing this gorgeous Sherri Baldy's My Besties digi gnome image and printed it off onto Color copy 160gsm paper.  Following that I coloured the image using my Spectrum Noir Tri-blend brush pens - starting with the face and hands, before moving onto the gnomes beard/hair (for this i used silver lining promarker).  For the gnomes clothing I decided to do rainbow colours using the light and mid shade of the tri-blend brush pens, finally then adding colour to the rest of the image. Next it was onto creating the background so I took a 7" by 7" white card blank along with a time for tea designs medium blend...