Posts

Showing posts with the label Time for Tea Designs

Color it - Create It - Show it off! May Challenge Reminder

Image
 Hey Everyone!  Wow, where has the time gone, can not believe we are half way through May already.  So its that to remind you all of the challenger running over on the Color it - Create It - Show it off blog whereby as usual anything goes, for more details or to enter click  here. This is a card I made for a friends daughters 8th birthday whom loves lounging around in pj's.  Firstly I started off by downloading the digital image and then printing it out via my printer on paper of a reasonable weight and that is suitable for colouring with alcohol markers.  I printed her out so that 2 of the images fitted on a A4 piece of paper.  Once printed I coloured in the image using spectrum noir triblend brush pens and pro-markers.  As I printed off two images I decided to colour both so I could then choose which one I preferred.   On a 8 by 8 card blank I then using Time for Tea Designs Dandelion stencil, a blender brush and my distress oxide kitsch fl...

TLC Designs - two cards completed

Image
Hey all! Hope you are all well.  So today I wanted to share two cards I've made using a new company to me (TLC Designs), which I happened to stumble across; the cards are using the company's digital products while I await arrival of my stamps and dies. As with the majority of my blog posts you can find a list of the products used along with a link to them at the end of this post. Pumpkin Gnome Card So firstly for the first card I printed the digital image of the gnome out and then coloured the image using Crafters Companion Spectrum Noir Triblend brush pens, before cutting the image out. I also printed the leaf patterned paper and sentiments which came from the Jack O'Gnome digital stamp set.   On a 7 by 7 inch white card blank I then stuck down the bronze embossed card using red liner tape, which I had cut down to 6 1/2 inches by 6 1/2 inches, before then sticking the leaf patterned paper on top of the bronze card (the leaf paper was 6 inches by 6 inches). I then cut out t...

Color It - Create It - Show It Off! April Challenge

Image
Hey everyone, Wow the start of another month already so that can only mean one thing the start of another challenge for Color it - Create it - Show it off! As always it is anything goes, for more information  click here.  So here is my inspiration for the start of this new challenge month, using Sherri Baldy's My Besties Gigglebox Gardening Time Doll 3, which can be purchased from   here. Absolutely loving all the my besties images I am getting to play with the images are super cute and so enjoyable to colour. Firstly I started by printing of my image on too A4 paper I tend to print 4 of the each of the images onto a sheet of A4 to give me an ideal size image to then put onto an A6 sized card.  Once I had printed the images I then cut the paper into four giving me four separate toppers, which I then coloured one using Spectrum Noir Triblend brush pens.   Following that I was unsure what to do next so I took the time to look around my craft area at products ...

Colour it - Create it - Show it off! March Challenge Reminder

Image
Hey all! So here we are half way through March already and just wanted to remind you to enter into the challenge where as usual it is anything goes, to enter and for more information  click here . Absolutely loving the images I've been able to play with this month on the design team, so much I've made another 2 cards.   So starting with the card on the left the more complex of the two I would say. Firstly I downloaded the digi stamps and printed four images onto a sheet of A4  Color copy 160gsm pape r, which I then cut up to individual toppers.  Using Spectrum Noir Triblend brush pens I coloured in the one of the images, deciding to give the fairy a tanned colour to her skin along with a orange dress and accessories.  I used a spectrum noir clear sparkle pen to go over the fairies wings to give them a sparkle and coloured the bug's wings with a spectrum noir sandstone sparkle pen.   I cut down an A4 piece of super smooth card suitable for alcohol markers to...

Elephant paper hugs

Image
Hey all! Hope you are well. Today I’m sharing a card I made for a crafty friend who has hurt her arm and unable to currently craft. Firstly I got a plain white A6 size of card stock and with my distress oxide mowed lawn, medium beautiful blender brush and the stencil a sunny side up again using the grass edge I created a grass layer on the bottom section of the card blank. Once the grass was completed I took my stormy sky distress oxide and the relevant blender brush and this time using the cloud edge of the stencil I created two layers of clouds. Once the background was finished I left it to dry for a while before taking the paper hugs die and cut into the background created. Then sticking the main panel of the back ground including the inside parts to the letters to and A6 white card blank.  To the paper hug letters I added foam tape before removing the backing paper and adhering each letter back in to place. I then took an elephant with a heart which I had pre-coloured using pro...

Time For Tea Designs - The Greater The Storm

Image
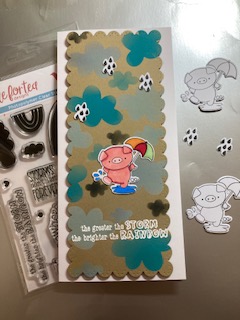
 Hey all! Just wanted to share with you a DL card I've made using Time for Tea Designs collections Hogs & Kisses and Storms Don't Last. Firstly I took a sheet of kraft card and cut out a panel using the scalloped slimline die.  Then using the over the rainbow stencil to ink blend clouds on to the kraft card panel using my time for tea designs beautiful blender brushes and distress oxides - tumbled glass, speckled egg, peacock feathers and black soot. Once I was happy with adequate number of clouds on the panel I then took from my pre-cut and stamped images a pig holding umbrella and splashing in a puddle.  To add colour to the image I used Spectrum Noir Triblend brush pens. Following colouring I decided I would heat emboss a sentiment in white along the bottom of the kraft card panel. To heat emboss I started by taking the sentiment stamp 'the greater the storm the brighter the rainbow' and sticking it to an acrylic block before adding Versamark ink to it and stampi...